This article describes the authentication with XMPP on a Django powered website.
Authentication without password
When you authenticate on a website, the domain validate your identity before letting you access confidential information. They are several ways perform this validation and the use of passwords is the most popular. Another method is the use of a token generator i.e. a small device that generate a secret passphrase that you copy on a website. Today I will present you another authentication method without password using XMPP.
XMPP authentication
XMPP has a nice authentication mechanism. It is normalized in the XMPP extension XEP-0070. It may be used on website. There are 4 steps.
- The user visits its favorite website and go to the login section.
- The user enter its jid (XMPP address) in a form and click on a button to authenticate.
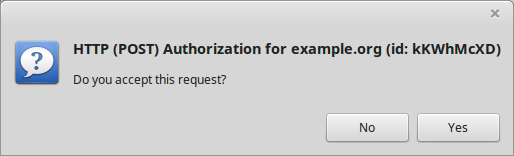
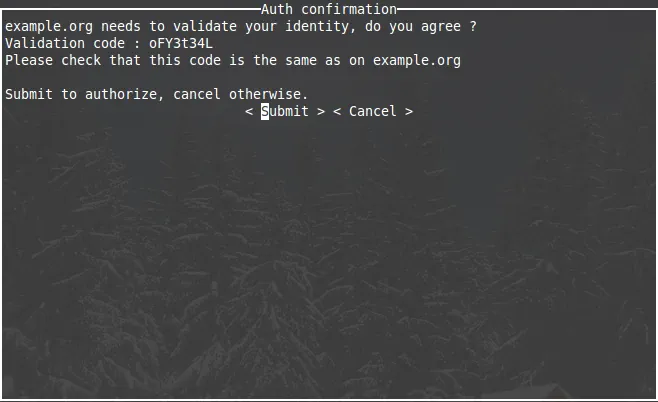
- The website send a XMPP request to the user asking if he wants to login on the website. The request display also a code that must be identical on the website and the XMPP client in order to validate the request.
- The user validate the request on its XMPP client and therefore he is login on the website.
There are plenty XMPP clients: Gajim, Salut-à-toi, Movim, Conversation, Poezio, Pidgin, Psi etc. Several of them work on mobile, on webpage or on Desktop. Therefore, it is possible to authenticate easily on a website using your smartphone, Desktop or another platform easily without password.
Note: if the client does not support the XEP-0070, there is a fallback mechanism where the user send back the validation code in a chat window. Therefore, it is possible to authenticate with all XMPP clients.
Examples
Gajim
Salut à toi (Primitivus)
The following section presents the implementation of this mechanism on a Django website.
Use XMPP authentification mechanism with Django
Make it easy with HTTPAuthenticationOverXMPP
In this section, the XMPP part is managed by a component written by "Chteufleur". This component is easy to use. It manage the XMPP session and the web developeur just have to make a request to the component and it sends a return code:
- 200 : User accepts the request
- 400 : One or more mandatory parameter(s) is missing
- 401 : User denies the request or timeout
- 520 : Unknown error appends
- 523 : Server is unreachable
The installation procedure is described in the Readme file of the project (https://git.kingpenguin.tk/chteufleur/HTTPAuthentificationOverXMPP).
Django files
The view manage the form fields and send the jid and validation code (transaction_id) to a module called XmppBackend. The transaction_id is generated when the form is accessed. Its value is kept in memory by using the session mechanism of Django (see section Settings.py).
Several files are needed to obtained the desired result. The following sections describes them.
Forms.py
from django import forms

class AuthForm(forms.Form):
    username = forms.CharField(max_length=100, help_text="(XMPP jid)")
HTML template
{% extends "base.html" %}

{% block content %}

{% if form.errors %}
<p>Your username is invalid. Please try again.</p>
{% endif %}

<form method="post" action="{% url 'login' %}">
   {% csrf_token %}
   <table>
       {{form.as_p}}
    </table>
    <input type="submit" value="Login" id="Login" name="login"/>
</form>
Your validation code: {{ transaction_id|linebreaks }}
<strong>{{ status_msg|linebreaks }}</strong>
{% endblock %}
Views.py
views.py reads the content of the POST and sends the result to xmpp_auth. It also handles the session and the transaction_id generation.
from django.shortcuts import render
from django.contrib.auth import login
from django.http import HttpResponse
from . import xmpp_auth
from .forms import AuthForm


def index(request):
    return render(request, 'index.html')


def xmpp_authentification(request):
    xb = xmpp_auth.XmppBackend()
    transaction_id = None
    status_msg = ""
    if request.method == 'POST':
        try:
            transaction_id = request.session.get('transaction_id')
        except KeyError:
            request.session['user_logged_in'] = False
            return render(request, 'fail.html')
        form = AuthForm(request.POST)
        # check whether it's valid:
        if form.is_valid():
            username = form.cleaned_data['username']
            user, status_code = xb.authenticate(username=username, password=None, transaction_id=transaction_id)
            if user is not None:
                login(request, user)
                # Redirect to a success page.
                request.session['user_logged_in'] = True
                return render(request, 'success.html')
            if status_code == 401:
                request.session['user_logged_in'] = False
                status_msg = "User {} refused to authenticate.".format(username)
        else:
            request.session['user_logged_in'] = False
            return render(request, 'fail.html')
    else:
        request.session['user_logged_in'] = False
        transaction_id = xb.id_generator(6)
        request.session['transaction_id'] = transaction_id
        form = AuthForm()

    return render(request, 'registration/login.html', {'form': form , 'transaction_id' : transaction_id,
                                                       'status_msg': status_msg})
xmpp_auth.py
This module makes the following request to the component:
GET /auth?jid=user%40host%2fresource;domain=example.net;method=POST;transaction_id=what_you_want;timeout=120 HTTP/1.1
The component send back a return code. In case of success, the system try to find the user in the database. If this user does not exist, it is created. The system described here is simple and the code must be adapted for more complex website (profile creation, additionnal data etc).
id_generator is called by views.py and by default, it send a code made of 8 characters (both letters and digits) but it is possible to adapt easily this behavior.
import sys
import requests
import string
import random
from django.contrib.auth.models import User


class XmppBackend(object):
    """
    Authenticate with the XMPP 00-70 XEP
    """
    def __init__(self):
        self.transaction_id = None

    def get_transaction_id(self):
        return self.transaction_id
    def set_transaction_id(self, transaction_id):
        self.transaction_id = transaction_id


    def authenticate(self, username=None, password=None, transaction_id = None):
        # Check the token and return a user.
        timeout = 300
        payload = {'jid': username, 'domain': 'agayon.be', 'method': 'POST', 'timeout': timeout,
                   'transaction_id': transaction_id}
        r = requests.get('https://auth.agayon.be/auth', params=payload)
        if r.status_code == 200:
            try:
                user = User.objects.get(username=username)
            except User.DoesNotExist:
                # Create a new user. There's no need to set a password
                user = User(username=username)
                user.is_staff = False
                user.is_superuser = False
                user.save()
            return user, r.status_code
        if r.status_code == 401:
            print("User {} refused to authenticate".format(username), file=sys.stdout)
            return None, r.status_code
        return None, r.status_code

    def id_generator(self, size=8, chars=string.ascii_letters + string.digits):
        self.transaction_id = ''.join(random.choice(chars) for _ in range(size))
        return self.transaction_id
Settings.py
The setting of the website must be adapted to your needs. In this simple example, the sessions must be enabled (it is the case by default). Our example use cached session but you can use cookies or even databases. See the excellent documentation of Django for additional information.
LOGIN_URL = '/path/to/login/'

CACHES = {
    'default': {
        'BACKEND': 'django.core.cache.backends.memcached.MemcachedCache',
        'LOCATION': 'unix:/tmp/memcached.sock',
    }
}
Links
- XEP-0070
- Authentication component by Chteufleur
- Description of the mechanism (french)
- Django authentification
Credits
- The image comes from the post on Linuxfr (by Chteufleur).
- The description of the XMPP component comes from its repository (by Chteufleur).